By Tarek, CraftsVinyl by Plotto
Short answer: Cricut Design Space is the free app you use to design, size and send projects to your Cricut machine. You build your design on the canvas, save it, then press Make, choose your material and cut. You don’t need a subscription to start: your own uploads and basic tools work without one.
If you’ve just unboxed your first machine and want project ideas before you dive into the software, start with what to make with a new Cricut. This page is the map for our whole Design Space series. It walks you round the screen, explains what’s free and what isn’t, and runs one real project from blank canvas to finished bag. Each section then points you to a deeper guide.
One honest warning first. Cricut moves buttons around quite often, and 2026 has been a busy year for it. If something isn’t where we say, look in the neighbouring menu before you panic. The tool almost always still exists.
What is Cricut Design Space and do I need it?
Yes, you need it. Cricut machines don’t cut from a USB stick or a file on their own; every cut goes through Design Space. It works with the Joy, Joy Xtra, Explore and Maker families, and it’s where you:
- add text, shapes and images (or upload your own)
- size everything to the real object, in centimetres
- tell the machine what material you’re cutting
- send the job to the machine and follow the prompts
Think of it as two halves. The canvas is where you design. The Make screen is where you prepare the mats and cut. Most beginner mistakes happen in the gap between the two, so we’ll cover both.
Is Cricut Design Space free?
The app itself is free to download and use. Without paying anything you can upload your own SVG, PNG and JPG files, type text, use basic shapes, resize, weld and attach, and cut as often as you like. A small selection of Cricut’s own images and fonts is free too; filter by “Free” when you search.
Cricut Access is Cricut’s optional paid subscription. It unlocks a much larger library of ready-made images, fonts and projects, plus some extra features. Anything that needs Access is marked with a badge. Cricut’s AI tools run on credits, and how many you get depends on your plan. Prices and plan contents change, so check inside Design Space before you subscribe.
Our advice for a new owner: don’t subscribe on day one. Make a few projects with free fonts and your own uploads first. You’ll soon know whether you’d use the big library.
Cricut Design Space download: how do I install it and choose my machine?
Design Space runs on Windows and Mac computers and as an app on iPhone, iPad and Android. You download it rather than using it in a web browser.
- Download Design Space for your computer or from your phone’s app store.
- Sign in, or create a free Cricut ID.
- Follow the new-machine setup when you first connect by USB or Bluetooth.
- On a new project, check the machine name at the top of the screen (for example “Maker 3”). If you own more than one machine (say a Joy and an Explore), switch it here before you design, because mat sizes and materials differ.
The desktop version has the most tools. The mobile apps are handy for quick name projects, but tools sit along the bottom of the screen and a few features differ. If a guide in this series mentions a desktop-only feature, we’ll say so.
What’s on the Design Space canvas?
When you start a new project and choose a blank canvas, you’ll see four areas. Learn these and the rest of the series makes sense.
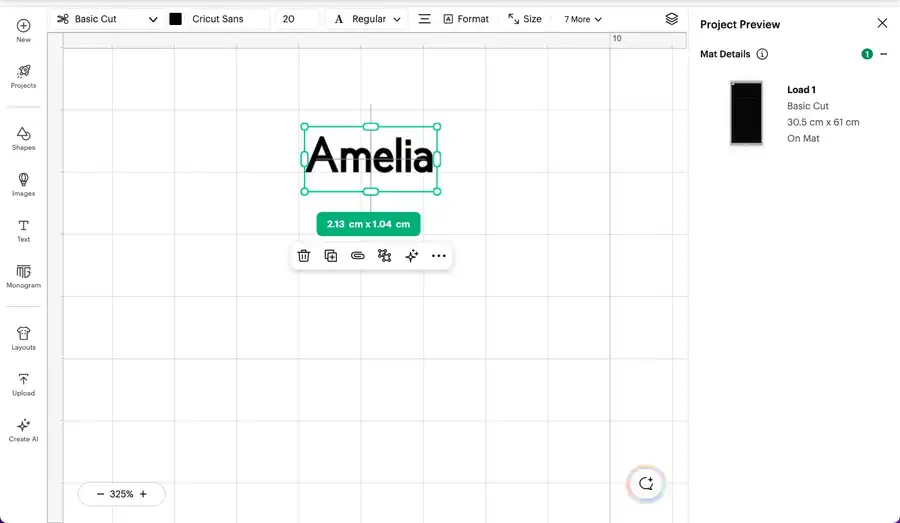
| Area | Where it sits (desktop) | What you do there |
|---|---|---|
| Design panel | Left-hand side | Add Text, Shapes, Images, Templates and Upload your own files |
| Top toolbar | Across the top of the canvas | Operation (cut, draw, score), colour, size, rotate, flip, arrange, align, text settings and effects |
| Canvas | The grid in the middle | Arrange your design; the grid shows real size |
| Layers panel | Right-hand side | See every layer, hide or show it, and group, weld, attach, slice and flatten |
On a phone or iPad, these panels shrink into menus along the bottom of the screen, and the tools only appear once you’ve tapped an object.
Two tips that save a lot of muddle. First, the canvas grid is real size, so a design that looks tiny on screen really is tiny. Measure your blank with a tape measure and type that size in. Second, the Undo arrow is your friend. Experiment freely; one click puts it back.
Which Design Space tools will I use most?
You don’t need every button. These are the ones you’ll reach for on almost every vinyl project, with the guide that covers each in depth.
How do I add and edit text?
Click Text in the design panel, type your words, then choose a font from the font menu at the top. You can filter for free Cricut fonts or use fonts installed on your computer. Letter spacing and line spacing sit with the text settings. Our guide to text and fonts covers spacing, curved text and monograms.
How do I resize and line things up?
Select an object and type a width or height in the size boxes at the top. Keep the padlock closed so it doesn’t stretch. Align, rotate, flip and arrange sit in the same toolbar. See sizing and positioning designs.
What do Weld, Attach, Slice and Group do?
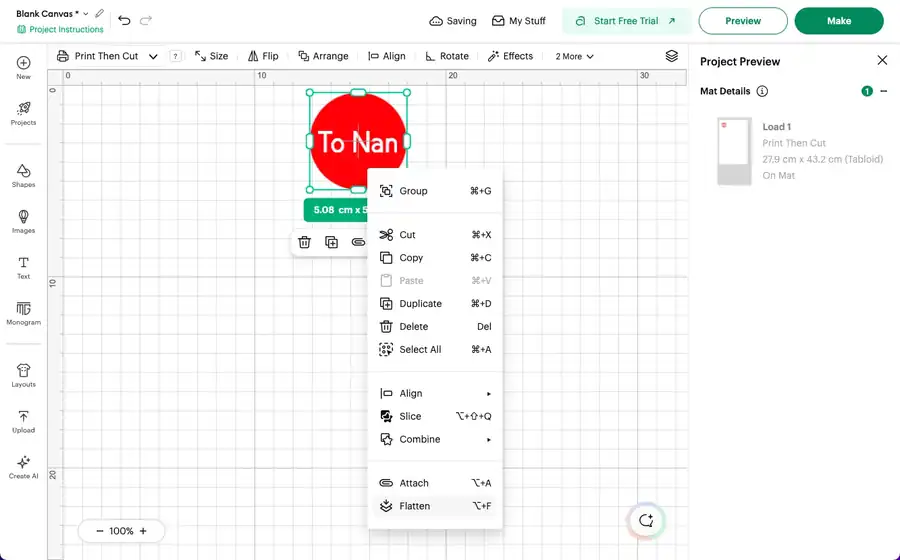
These are the four that confuse everyone. In short: Weld joins overlapping shapes into one cut, Attach keeps pieces in place on the mat without joining them, Slice cuts one shape out of another, and Group just moves things together on screen. Select two or more layers and right-click to find them (Weld sits under Combine), or use the buttons at the bottom of the Layers panel. Our guide to Weld, Attach, Slice and Combine shows when to use each.
Where are Offset, Contour and Warp?
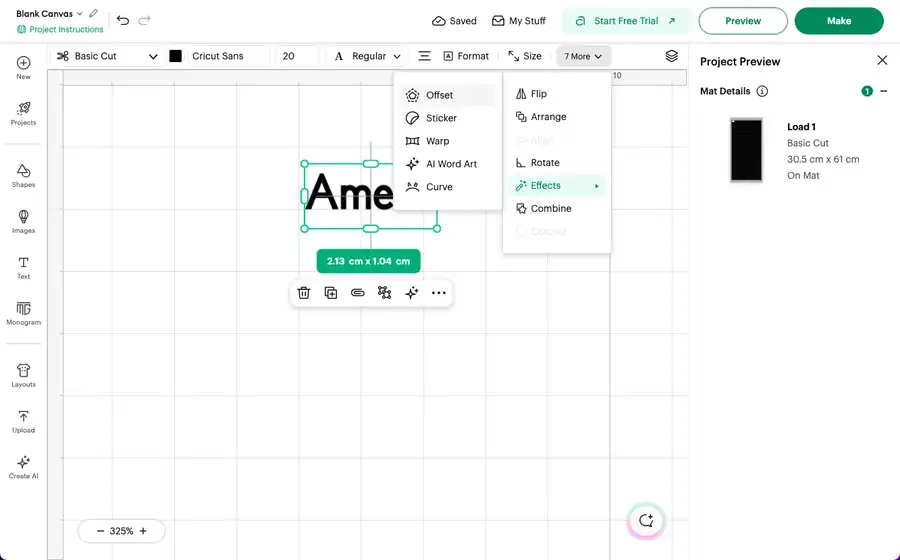
These tools have moved more than any others. Offset, Sticker and Warp sit under Effects in the top toolbar. On a smaller screen, Effects moves into the More menu at the end of the toolbar. Contour sits in that More menu and at the bottom of the Layers panel. Offset adds an outline round a design, Contour hides cut lines you don’t want, and Warp bends text into shapes like an arch. See Offset and Contour.
How do I upload my own designs?
Click Upload in the design panel, choose your SVG, PNG or JPG, and follow the steps. SVGs come in ready to cut; photos and PNGs may need the background removed. Our uploading guide covers this, including where to find free SVGs you’re allowed to use.
What about Print Then Cut, stickers and pens?
Print Then Cut lets you print a design at home and have the machine cut round it, which is perfect for stickers. Pens, drawing and score lines use the Operation menu at the top. See Print Then Cut and stickers and Pen, Draw and Score.
How do I save projects in Design Space?
Click Save at the top, give your project a clear name and it’s stored in your Cricut account. You’ll find it later under My Stuff at the top of the canvas, in the Projects tab, on any device you sign in to. The desktop app doesn’t auto-save, so save as you go.
Name projects so you can find them in a year’s time. We use the item, the person and the size, for example “PE bag – Amelia – 20 cm”. When the next school year comes round, you open it, change the name and cut.
What happens on the Make screen?
When your design is ready, click Make (top right). Design Space splits your design by colour onto separate mats. Here you:
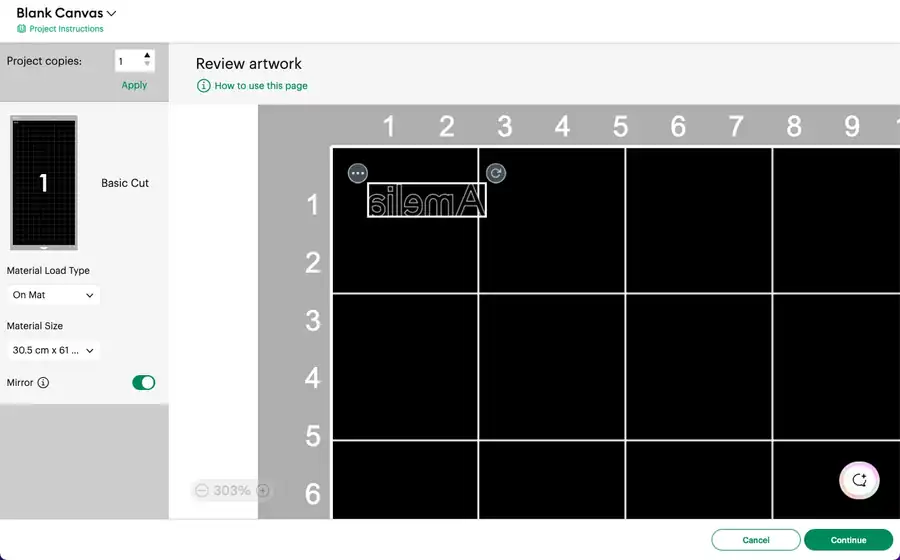
- check the mat preview, and drag pieces closer together to save vinyl
- turn Mirror on for iron-on vinyl (HTV), because you cut it from the back; leave Mirror off for adhesive vinyl
- set the number of project copies
- choose whether you’re loading on a mat or without one, if your machine and material allow
Click Continue, choose your material from the list and follow the prompts to load and cut. With Cricut-compatible vinyl, pick the closest material setting and do a small test cut first. If it doesn’t cut cleanly, try the More pressure option. Our guides to the Make screen for vinyl and cut settings go through every option.
Worked project: a name on a school PE bag in iron-on vinyl
Here’s one real project from start to finish. It uses the free version of Design Space and a sheet of iron-on vinyl.
- Measure the bag. A typical drawstring PE bag has about 25 cm of usable width. Leave at least 5 cm below the drawstring channel so the name doesn’t disappear into the gathers.
- Start a new project and pick a blank canvas. Check your machine is selected.
- Add the name. Click Text and type it, for example “Amelia”. Choose a chunky, rounded font; thin script letters are hard to weed and can lift in the wash.
- Size it. With the padlock closed, set the width to 20 cm. Check the height looks sensible for the bag.
- Join the letters if needed. If you chose a script font, tighten the letter spacing until the letters touch, then Weld so it cuts as one word.
- Save it as “PE bag – Amelia – 20 cm”.
- Click Make. Turn Mirror on. The name should now read backwards on the preview.
- Load the vinyl shiny side down on a mat, choose the closest iron-on setting, and cut.
- Weed away the spare vinyl so only the letters stay on the clear carrier sheet.
- Press it on. Follow the instructions supplied with your vinyl for temperature, time and peel. Press on a firm surface such as a pressing mat on a table, not an ironing board.
A tip from our own cutting table: before cutting the whole name, add a 2 cm square to the corner of the canvas and cut that on its own first. It uses almost no vinyl and tells you in seconds whether the setting cuts through the vinyl but not the carrier. Then hide the square in the Layers panel and cut the real job.
Once you’ve done this once, a set of hen-do T-shirts or a Christmas bauble decal is the same steps with a different design. For iron-on vinyl in lots of colours, browse our iron-on vinyl.
What are the most common Design Space mistakes?
| Mistake | What you’ll see | The fix |
|---|---|---|
| Forgot to mirror iron-on vinyl | Letters read backwards on the garment | Turn Mirror on for every iron-on mat on the Make screen |
| Text cut as separate letters | Loose letters scattered on the vinyl | Weld script text before you click Make |
| Design split across mats | Pieces you placed together land in different spots | Attach the pieces that must stay in position |
| Wrong size | Name too small for the bag | Measure the item and type the size; the grid is real size |
| Wrong machine selected | Mat sizes or materials don’t match | Check the machine picker before you design |
| Can’t find a tool | Button missing after an update | Check Effects and the More menu in the top toolbar, or right-click your selection |
Cricut Design Space FAQs
Can I use Cricut Design Space without Cricut Access?
Yes. You can upload your own designs, use free fonts and images, and cut without a subscription. Cricut Access adds a bigger library and some extra tools.
Can I use Design Space on my phone?
Yes, there are apps for iPhone, iPad and Android. They suit simple text and name projects. For layered designs and the full set of tools, the computer version is easier.
Do I need the internet to use Design Space?
Mostly, yes. You need to be online to sign in, save to your account and use Cricut’s images. Some offline use is possible in the apps, but you can’t count on every feature.
Can I use my own fonts in Design Space?
Yes. Fonts installed on your computer show up in the font menu. On iPhone and iPad you need to install fonts through a separate font app first.
Why does my design look different after an update?
Cricut changes the layout from time to time. The tools are usually still there, just in a different menu. Check the top toolbar menus and the Layers panel.
Every guide in the Cricut Design Space series
| Guide | What it covers |
|---|---|
| Cricut Design Space for beginners (this page) | The canvas, saving, free vs Access, the Make screen |
| Print Then Cut and stickers | Printable stickers, templates, patterns |
More guides in the series are on the way: Weld, Attach, Slice and Combine; text and fonts; Offset and Contour; sizing and positioning; the Make screen for vinyl; cut settings; uploading SVGs; and Pen, Draw and Score.
Ready for your first project?
Brand new to cutting machines? Our Cricut beginner guide covers the basics before you open the software. If you’re still gathering supplies, our Craft Studio Kit puts a mini heat press, iron-on vinyl sheets, adhesive vinyl rolls and transfer tape in one box. You’ll find everything else in our Cricut-compatible and Silhouette-compatible range. We offer free shipping all over the UK with UK dispatch, and free returns within 14 days.