
Part of our Cricut guides – step-by-step help for UK crafters.
By Tarek, CraftsVinyl by Plotto
Short answer: Cricut Print Then Cut lets your home inkjet printer print a full-colour design, then your Cricut reads the black border printed round it and cuts neatly round each shape. In Design Space you set the layer to Print Then Cut, press Make, send it to your printer, then load the printed sheet on a mat and cut. It works on the Explore, Maker, Venture and Joy Xtra families, but not on the original Cricut Joy.
This guide is part of our Cricut Design Space guide for beginners, the hub for the whole series. Here we cover Print Then Cut itself, the sticker tool, patterns and templates, and we make one real project as we go: a sheet of personalised Christmas gift labels.
What is Cricut Print Then Cut, and which machines can do it?
Most Cricut projects cut a single colour of material, such as vinyl. Print Then Cut is different. Your printer puts the colour down, including photos, gradients and fine detail you could never weed, and the machine only does the cutting.
To make that work, Design Space prints a thin black frame (the registration marks) round your design. A light sensor on the machine finds those marks, works out exactly where the print sits on the mat, then cuts.
You need:
- A Cricut Explore, Maker, Venture or Joy Xtra (newer models in those families included). The original Joy has no sensor for Print Then Cut.
- An inkjet printer. Laser printers can work on paper, but most printable vinyl and sticker sheets are made for inkjet only, so check the pack.
- A printable material: sticker paper, printable vinyl, card or heat transfer paper for fabric.
- A LightGrip or StandardGrip mat (more on that below).
How do I use Print Then Cut in Cricut Design Space?
Here’s the whole process from blank canvas to cut stickers. Desktop and the mobile apps follow the same order, though button names can sit in slightly different places on a phone.
- Add your design. Upload a PNG or JPG, pick an image from the library, or build one from text and shapes.
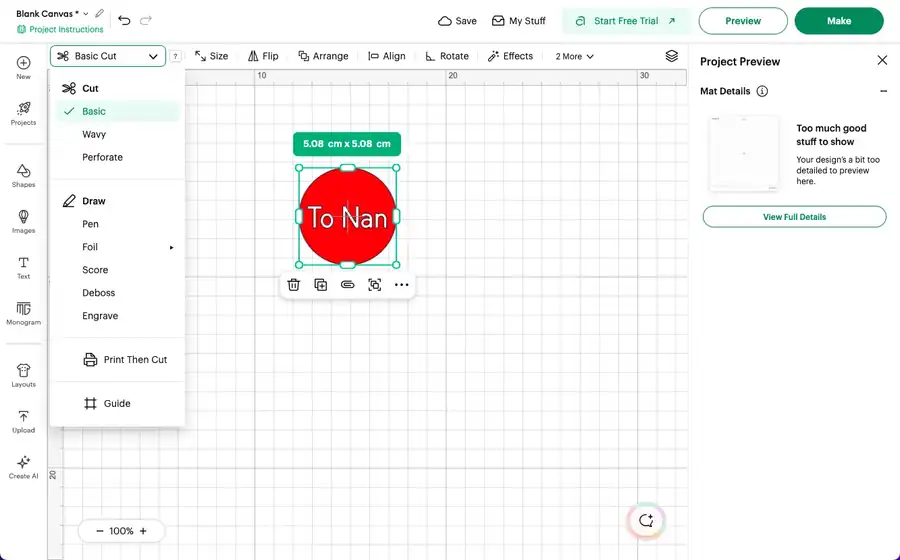
- Make it printable. Select the layer and open the Operation menu in the top toolbar. Change it from Basic Cut to Print Then Cut. If your design has several layers (text on a coloured shape, for example), select them all and use Flatten instead (right-click the selection, or use the Flatten button at the bottom of the Layers panel). Flatten merges them into one printable image, so the colours print together and the machine cuts only the outside edge.
- Check the size. Design Space shows a warning if the design is bigger than the print area allows. Use the size boxes to shrink it, or the Auto-Resize prompt if it appears.
- Press Make. Your designs are laid out on a preview page with the black frame round them. You can drag pieces about on this screen to fit more on a sheet.
- Send to printer. The Print Setup box opens. Pick your printer and leave Add Bleed on (see the next section). Switch on Use System Dialog if you want to choose paper type and print quality in your printer’s own settings.
- Let the ink dry, then lay the sheet on the mat, printed side up, lined up with the top-left corner of the grid.
- Choose the material setting that matches what you printed on, load the mat and press Go. The light on the machine scans the corners first, then cuts.
What do bleed and Use System Dialog mean?
Add Bleed prints a little extra colour just past the cut line. If the cut lands a hair off, you still get colour right to the edge instead of a white sliver. Leave it on for stickers and labels. Switch it off only when you want a deliberate white border.
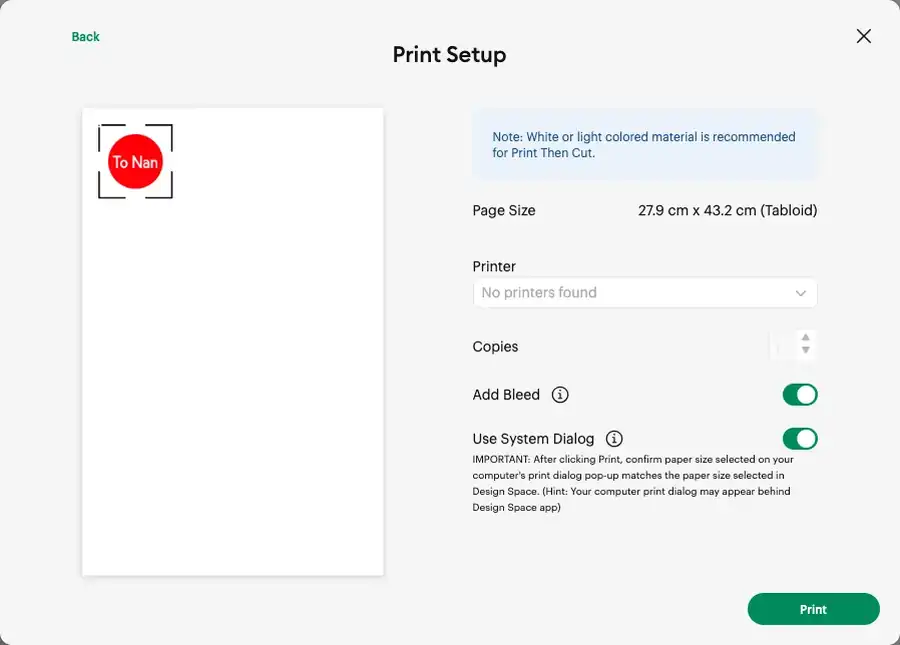
Use System Dialog opens your printer’s own settings. Use it to pick the paper type and the best print quality, since the default setting often prints too faint for stickers.
How do I calibrate Print Then Cut?
If your cuts land a few millimetres off the print on every sheet, calibrate. Where calibration sits depends on your version of Design Space. If you can’t spot it in the settings, click Help at the top of the screen and search for Print Then Cut calibration. It prints a test sheet with a box and some lines. You put that on the mat and let the machine cut it, then answer a few questions on screen about where the cuts landed. It only takes five minutes and an A4 sheet of plain paper, and you only need to repeat it if you change machine or printer.
How big can a Print Then Cut design be?
On A4 paper the usable print area has traditionally been about 17 x 23.5 cm. Newer versions of Design Space allow larger sheets on some machines: on our Maker 3, Design Space offers page sizes up to Tabloid (27.9 x 43.2 cm). Set your paper size first under the load and page settings, and if your design goes red, shrink it or use Auto-Resize. Don’t fight the limit by scaling the printed sheet in your printer settings: that moves the black frame and the cut won’t line up.
How do I make stickers with a Cricut?
You can make stickers two ways. The quick way is to put each design on its own white or coloured backing shape, flatten, then Print Then Cut. The slicker way is the sticker tool.
Where is the Sticker Maker in Design Space?
Offset, Sticker and Warp sit under Effects in the top toolbar. On a smaller screen, open the More menu at the end of the toolbar first, then Effects. Select your image or text and choose Sticker. It adds a border round the design, flattens it and sets it to Print Then Cut in one go. In the Sticker panel you can choose Kiss Cut or Die Cut, switch the border on or off, change its thickness and pick its colour.
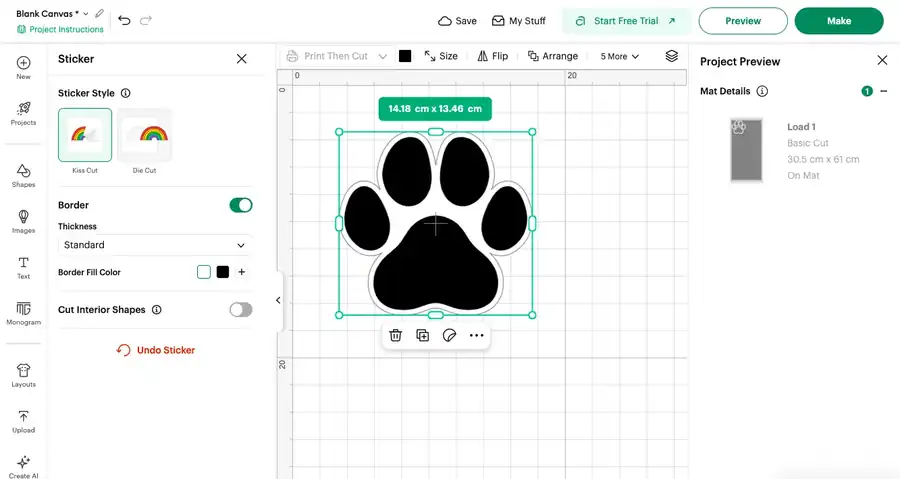
Use it when you want classic die-cut stickers with an even white edge. For a sheet of labels on rectangles or circles, the shape method is just as quick.
What material setting should I use for stickers?
Pick the setting that matches the sheet you bought. Design Space lists several printable sticker papers and a Printable Vinyl setting. Thin paper stickers usually want a kiss cut, which cuts the sticker but not the backing, so you can peel them off a sheet. If the machine cuts right through, try the same setting with less pressure. If it barely scores the top layer, add pressure. Always do one small test sticker first.
Are Cricut stickers waterproof?
Not on their own. Inkjet ink on sticker paper will run if it gets wet. Printable vinyl copes better with the odd splash, and a clear self-adhesive laminate over the print before cutting helps even more. For anything that goes through a dishwasher, cut it from adhesive vinyl instead and layer the colours, rather than printing it.
What are Patterns and Templates in Design Space?
These two often get mixed up, and they do very different jobs.
Patterns fill a shape or letter with a repeating print, such as tartan, snowflakes or leopard print. Select a layer, change its Operation to Print Then Cut, then choose Pattern instead of a flat colour. It’s a lovely way to make patterned gift tags without buying patterned paper. Some patterns are free and some are part of Cricut Access, so check the badge before you design round one.
Templates show your design on a background, such as a T-shirt, tote bag or mug, so you can judge the size. Most templates are only a preview and won’t print or cut. Sticker and label templates are the exception: they give you a ready-made layout to fill. Treat a T-shirt template as a ruler, not part of the project.
Worked project: personalised Christmas gift labels
Let’s make a sheet of round gift labels for the presents under the tree, each one with a name. It takes about half an hour, including drying time.
- Insert a circle 5 cm wide and colour it deep red.
- Add text on top in a script font, such as “To Nan”, in white, and centre it on the circle.
- Add a small holly or star image from the library, or upload your own PNG, and place it under the name.
- Select all three layers and press Flatten. They become one printable label.
- Duplicate the label and change the name on each copy. You’ll need to unflatten (or keep an unflattened copy) to edit the text, so save a master first.
- Press Make. Design Space fits the labels onto the sheet. On A4 you’ll get around 15 labels at 5 cm.
- Send to printer with bleed on, choose your sticker paper in the system dialog and pick the best quality.
- Leave the sheet for ten minutes, then place it on a LightGrip mat and press it flat from the centre out with a scraper.
- Choose your sticker paper setting, load and cut.
Want the same design on fabric, say for a Christmas Eve box liner or a stocking tag? Print it on our heat transfer paper for light and dark fabrics instead, cut it with Print Then Cut and press it on. Follow the instructions supplied with the paper for mirroring and heat. If you’d rather cut names in a single colour, iron-on vinyl gives a crisper, longer-lasting finish on clothes.
A tip from our workbench
Before you print on a sheet of sticker paper, print the same layout once on plain paper. Lay the sticker sheet over it against a window. If any label sits too close to the black frame, you’ll see it straight away, and you’ve only wasted a sheet of copier paper. We also put a small pencil tick on the back of each sticker sheet before it goes in the printer. It sounds daft, but it ends the “which side does it print on?” guessing, and it saves a ruined sheet of the good stuff.
Why won’t my Cricut read the Print Then Cut marks?
This is the most common Print Then Cut problem, and it’s nearly always light or shine.
- Glossy or laminated sheets. The sensor gets confused by reflections. Use matte sticker paper, or laminate after cutting rather than before. If you must use gloss, try covering just the black frame lines with a strip of matte tape.
- Bright light on the machine. Direct sunlight or a desk lamp shining straight at the mat can blind the sensor. Turn it away and try again.
- The sheet isn’t flat or straight. Line it up with the top-left of the grid and press it down firmly, especially the corners.
- Faint printing. If the black frame looks grey, print at a higher quality setting.
- Dark or coloured material. The sensor needs a black line on a pale background. Print on white or very light sheets.
Common Print Then Cut mistakes and how to fix them
| Problem | Likely cause | Fix |
|---|---|---|
| Cuts land off the print by the same amount every time | Machine not calibrated | Run Print Then Cut calibration once |
| White edge round each sticker | Bleed was switched off | Switch bleed on and reprint |
| Each layer cut separately | Layers weren’t flattened | Select them all and Flatten before Make |
| Ink smudges on the mat | Sheet went on wet | Let it dry ten minutes before loading |
| Cut goes through the backing | Too much pressure for a kiss cut | Same setting, less pressure; test first |
| Design greyed out or red | Bigger than the print area | Resize or use Auto-Resize |
| Print scaled oddly | Printer set to “fit to page” | Print at 100% / actual size |
Print Then Cut FAQ
Can the Cricut Joy do Print Then Cut?
The original Cricut Joy can’t, because it has no sensor to read the marks. The Joy Xtra can, with smaller sheets.
Do I need Cricut Access for Print Then Cut?
No. Print Then Cut, Flatten and your own uploaded images all work without a subscription. Some library images, patterns and fonts carry a charge or need Cricut Access, so check the badge on anything you didn’t upload yourself.
Can I use any printer?
Any printer that prints at actual size will work on paper and card. Most sticker paper, printable vinyl and heat transfer paper is made for inkjet printers, so check the instructions on the pack.
Why does my Cricut cut the stickers in the wrong place?
Usually the machine needs calibrating, the printer scaled the page, or the sheet moved on the mat. Fix those three and most problems go away.
Where next?
Back to the Cricut Design Space guide for beginners for the full series. More guides are on the way, including Weld, Attach, Slice and Combine, uploading SVGs and images, and Offset and Contour.
If you’re still stocking up, browse our Cricut-compatible and Silhouette-compatible range for vinyl, mats and tools that fit every machine. We offer free shipping all over the UK with UK dispatch, and free returns within 14 days.